
Critter Creations: How I Make My Stickers – A Step-by-Step Guide
- Funny Critters
- Mar 6
- 3 min read
Hey critters! Welcome to our very first Critter Creations blog post! Today, I’m taking you behind the scenes to show you exactly how I make my stickers—from designing to printing, cutting, and finishing touches. Whether you're a beginner or just curious about the process, this guide has all the details you need.
1. Create Your Silly Designs
You can design your stickers in any way you like! Some popular methods include:
Illustrator (what I use)
Procreate
any other art soft wear
A hand-drawn sketch that you scan in
Even a Sharpie doodle! (If you're going this route, skip ahead past the printing section.)
2. Prep Your Design for Printing
Once your design is ready, you’ll need to move it into your printing software. This depends on whether you're using a cutting machine (like a Cricut) or just a regular printer.
I use a Cricut Maker 3, but I design everything in Illustrator first.
I add my sticker borders inside Illustrator (not Cricut) to keep them consistent. Otherwise, Cricut’s automatic border sizing can be a bit unpredictable.
How to add a border in Illustrator: Object > Path > Offset Path > Adjust to your preference
I export at x2 resolution to maintain the correct size.
Then, I import the design into Cricut’s Print then Cut feature.
After setting up my sticker sheets, I can easily rearrange designs without adjusting the cut settings each time.
3. Choose the Right Sticker Paper
Not all sticker paper is created equal! I tested five different types before finding my favorite. Here’s my experience with each:
Basic Matte Sticker Paper (School-provided) – Scratches easily but might work with a protective coating.
Clear Sticker Paper – Colors don’t print well because there’s no white base. Dark surfaces make designs hard to see.
PPD Sticker Paper – Prints fine but is very thick (not my favorite). Also, they come in with a different packaging then this, it was a surprise to me too.

Koala Printable Vinyl (Glossy) – Looked promising but had major issues. The ink didn’t adhere properly, causing color bleeding when exposed to liquid. Plus, glossy paper needs a coating anyway. (I even emailed support but never got a reply!)

Koala Printable Vinyl (Matte) – My favorite so far! ✅ Great color, ✅ Not too thick, ✅ Waterproof, ✅ Strong adhesion.

4. Print Your Stickers
Each sticker paper may require different printer settings, so check the recommendations!
I found that adjusting my computer’s print settings instead of using the default printer menu helps remove unwanted lines.
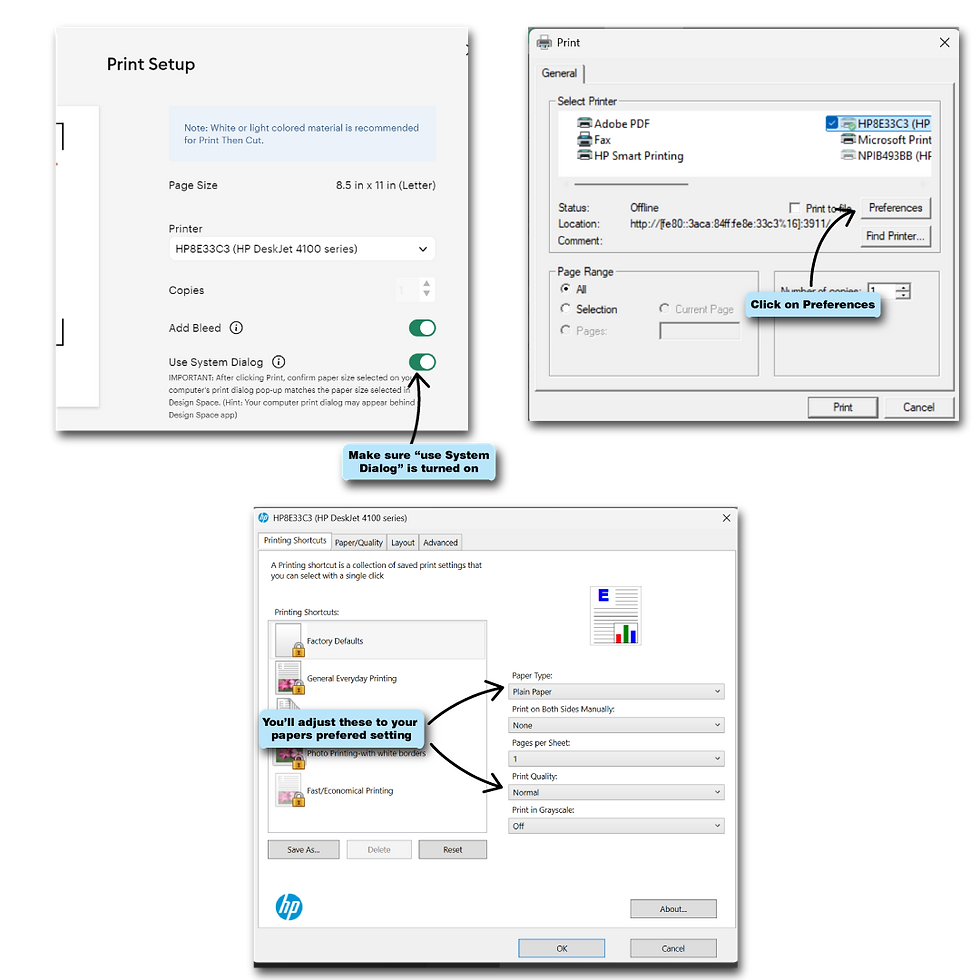
Printer used: HP DeskJet (it originally came with dried-out ink cartridges, but after replacing them, it worked fine!).
If your printer has streaks or faded areas, try cleaning the print heads, especially after a busy print day.
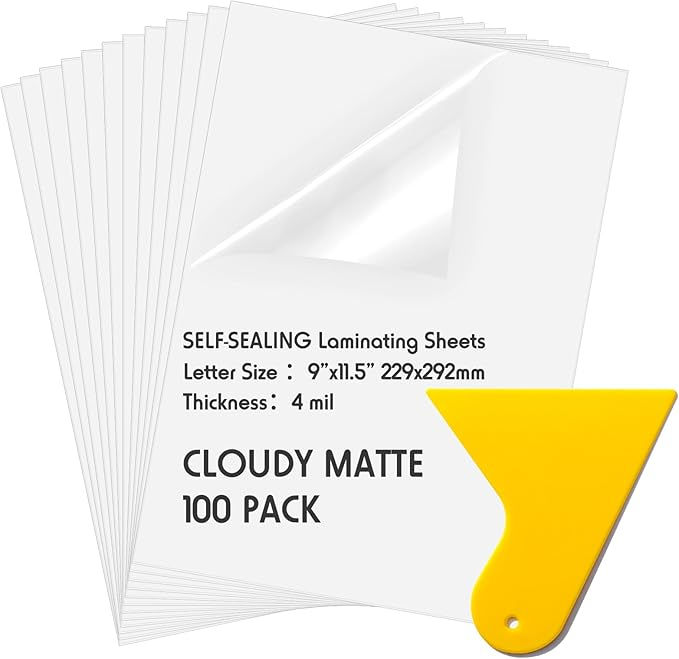
5. Make Stickers Waterproof & Scratch-Resistant
To protect your stickers, you’ll need a laminate coating. There are different types, but I’ve tried:
Kosiz 100 Pack Matte Self Adhesive Laminating Sheets – Cut or peel a section first so you can align it properly. Comes with a scraper to remove bubbles.
Avery 73601 Self-Adhesive Laminating Sheets – Has a “peel here” strip to help with alignment before fully sticking.

Regardless of finish, the final result depends on the laminate, not the paper, so choose what works best for you!
6. Cutting the Stickers
You can always cut stickers by hand with scissors (that’s how I started), or use a cutting machine like the Cricut Maker 3. But cutting machines aren't always perfect—here’s what I’ve learned:
Cricut Calibration: Always check that your machine is aligned before cutting. (If you’re unsure how, just Google it!)
Sticker Placement: Place your printed sheet in the top-left corner and align it carefully.
Glossy Paper Issues: Cricut scanners struggle with glossy surfaces because the reflection messes up the cut lines. A quick fix is to place matte tape over the registration marks to help the machine read it correctly.
Choosing the Right Cut Settings:
For matte stickers, glossy stickers, and laminated stickers, the cutting settings are generally the same. I use heavy-duty cardstock settings. You might need to adjust the pressure or set it to cut twice if the material is thicker, but overall the process is the same.
The only exception is if you’re using light, uncoated matte stickers, which might require different settings since they’re typically thinner and less durable.
If you want to get super specific, you can create a custom cutting setting by tweaking the pressure by around 20 points up or down, depending on how thick or thin your material is.
Final Thoughts + Ask Me Anything!
And that’s it—my full sticker-making process! If you have any questions or run into issues, feel free to comment below, and I’ll help brainstorm solutions.
Want more behind-the-scenes tips? Sign up for my newsletter to get exclusive updates, tutorials, and more Critter Creations content!
Commentaires